Saturday, September 6, 2008

Inspiration Nation

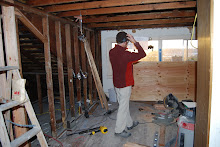
I took a walk around the neighborhood this morning to try to glean some inspiration by looking at projects that are bigger in scope than my own. It's been a few weeks since I've done any work upstairs let alone written about it here. School is cranking up again and that has been the major focus of all of my attention. I need to get into a new routine for the fall. Here are some highlights.

Date started: They tore down the house on this site sometime in 2007.

Uncompleted

There are some interesting things about this house. Looking through the windows, I think that they are going to be leaving the trusses uncovered on the third floor. The rectilinear cube thing with Hardipanel siding is all the rage right now.


Date started: spring 2008.
Uncompleted
This is a really wacky one. I couldn't get too much closer because there were people hanging out in the backyard and I wasn't feeling chatty. These folks are putting this crazy dormer roof deck thing on with an exterior staircase to get there. How will they finish this too blend it in?


Date started: I think they secured funding in 1998 or something.
Uncompleted. Scheduled to be completed summer 2010.
This is the new Jefferson Park underground reservoir vault. The new graded graveltop is new since the last time I was there. This is a really, really big project.


Date started: I don't know, but when I walked on this block three weeks ago, there was a regular looking house on this corner lot.
Clearly uncompleted
The foundation for this new sure to be space cube house is really small. It makes me think that they subdivided the lot and there will be a couple of townhomes on the site.


Date started: Who knows. They've been working on the light rail station forever.
Scheduled to be open Spring 2009.
Any time you have someone working on your project whose job title is 'miner', you know you're into something big.


Date started: Last fall
Uncompleted
The old jack up the house project. Yipes. THe client and I almost fell into this trap back in the Rainier Valley. These guys have had a massive dirtpile in front of their house for a long time.


Date started: This spring
Uncompleted
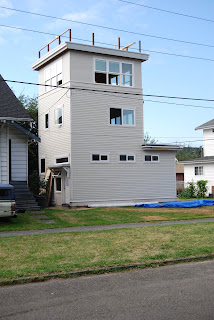
Embrace the density! These folks are going for the Cinderella tower/treehouse without a tree effect. It kind of looks like the bridge of a containership to me.


I guess it's time to stop fooling around and get back to work. Windows, finish the insulation, and cover!




Saturday, August 16, 2008

We Are the Ronchampions, My Friends

Yesterday, all eleven stairwell windows were installed along with the three windows in the south bedroom, which is quickly shaping up as this year's 'must have' bedroom.


The first part of the project was actually Operation Defenestrate Fife, wherein the windows had to be surgically extracted from the manufacturer. If you've never been to a fiberglass window manufacturing facility, well, it's huge and loud and kind of smelly in a solventy way, but really clean and full of trucks. I had to wedge my rented truck, which you can tell is a real gem, in between the many semis picking up much larger orders than mine.


As it turns out, I may have rented a little too much truck, but I wasn't really sure how much space the windows would be taking up.


On my way back from Fife, I passed this huge bus fire on I5 going in the other direction. It was scary. The bus was fully engulfed in flames, tons of black smoke everywhere, and it was really, really hot.


I had to call in reinforcements to get the larger windows into the south bedroom. Fortunately, I know a lot of teachers who do nothing but sit around and eat bonbons all day every day in the summer, so I gave Thatcher a call and he dropped the bonbons and was right over to help me muscle in the big guys.


Next, the stairwell one by ones. I figured out a good method to 1) get the windows in and level and 2) not fall off the ladder by the second window. Which means, of course, that I only had to do a do-over on the first one I did.


I stacked all the windows on my building platform inside and pulled them out one at a time to install. First I would put a bead of caulk around the window hole. Then I put a deck screw in one of the side holes of the window so that it would stay in the wall and I could still adjust it for level. After I levelled it, then I pounded in 2'' roofing nails through the rest of the holes in the fin. Wash, rinse, repeat times 11.


The window on the tippy top left is the only one that I had to redo.


Too pretty for captions. I thought I might have broken the client's camera, but no.


Tuesday, August 12, 2008

Super Exclusive Sneak Peek


The client-designed Church at Ronchamps-inspired staircase. Even I think it's going to be cool.


From the upstairs.


From the downstairs.

Roofers are not on my Good List

Seeing as we are going camping next week, there are things that absolutely just have to get done this week. Among those things is that the windows must go in. I've reserved a truck to go down to the Milgard folks down in Fife, WA to pick up the 15 windows for round 2, and they have to be installed by Saturday.

Since I had just gone through the process with Robert and then on my own, I really figured that I had this figured out. But, as with so many things, the roofers had it in for me. If you thought that drywallers were shortcut driven cavemen, well they look like overachieving Mensa types compared to roofers. The roofers who most recently worked on our house, I would assume maybe a year or two before we bought it, decided that instead of flashing the point where the roof hits the wall over our bedroom bumpout, they would just sheath over the old flashing and then bend some shingles up from the roof and tar them to the wall. This on the wall that takes the most weather in the house. Unbelievable. Unconscionable. Really. It's going to fail, and quickly. We're lucky we made it as long as we did without something catastrophic happening.
Anyway, I had to take a three day break from window prep to fix the roof. I tore out the top course of shingles and tore out the old flashing, which was enough tearing. I did the step flashing weave (like around the skylight) on the angled part of the roof and put some 4 '' flashing on the horizontal. Then it was a layer of bitumen (rhymes with 'haiku, son'- not 'vitamin') which was underneath the construction paper. I didn't really know what I was doing, so I used the Google, and I tell you what- when you Google 'roof flashing', the first few results you get have nothing to do with weatherproofing. My goodness, the internet is governed by perverts.
I eventually got some good help from the good folks at the FEMA website. Heckuva job, Brownie.
I had to do some serious hanging out over the edge of the roof, so I revisited my Knot Book and used a double bowline, which I tied to the inside of the house. One loop around each leg made for a good harness.
No flashing.
Superflashing.
Finally, I got to the windows, which went pretty quickly. I had to cut out the rest of the space for the new windows and then sheath over the places where there was going to be wall and no window where there was window before. Then tarpapering over the whole thing.
New framing.
New framing + new sheathing. Still need to cut out the rest of the top of the window. Which I did but I didn't take a picture of.

Tuesday, August 5, 2008

header's up.

It was a very exciting day around here yesterday indeed. I cut out a large part of the south wall's supporting structure and put in a giant header for some new windows.


The first step was to take out the existing window. I forgot, until I was about halfway through it, that you should always close the window before you remove it. And probably lock it. Otherwise, you have an issue of the stupid thing sliding open while it's being taken out and being very heavy on one side and not on the other. It came out pretty smoothly, despite my best attempts otherwise, and it is now relaxing, getting ready for the big move to the pile of other old windows.


The next step was to put in some braces to hold things steady up top. I don't actually think that these two temporary posts were actually holding too much up, but they made me feel better.


Next, cut the studs! 4 in all. 1 if them is too close to the camera to see. It was a little nerve-wracking, but there didn't seem to be any pressure on the saw blade as I was going through, so it didn't seem like too too much load was being exerted on them.


Then I had to make a little jig to hold up one end of the header as I jammed the other end into the wall. Pure, unadulterated muscle time.


There it is! Bracing is out and it seems to be holding up the roof and everything. Today I'll need to cut out the actual dimensions of the new window, build a new sill, get some new sheathing on the outside, and do the tar paper.


There was one last thing- I couldn't leave the big hole in the wall while I went out shopping, so I needed to cover it up. Of course, I didn't have enough plywood to do it, so I used what was at hand, which happens to be an old door. There won't actually be a sideways door here in the future, but I think that I'll be able to get some serious mileage out of it with the client.
Egress window code and whatnot.

Sunday, August 3, 2008

weekend projects

Well, it's the weekend, and not just any weekend. It's Seafair Weekend. The highlight of which is, for many, the annual visit of the Blue Angels. Also known as the U.S. Navy's precision flying team, also known as the U.S. Navy's very expensive way of recruiting high school dropouts into the service in hopes that they'll be top gun pilots when they are really going to end up refilling vending machines on aircraft carriers team.


I'd be less grouchy if they'd stop buzzing my house.


There's a lot to do around here, and Seafair is not enough of a reason to stop. Yesterday I embarked on what could generously be called a fool's errand, my own kind of wrestling with a plane.

On Tuesday, Robert and I pulled a big header out of the wall when we were putting in the new master bedroom windows. It wasn't really holding anything up, it looked more like a 12' spacer more than anything else. But now, we have the opportunity to actually use it as a header, holding up the roof over the new windows in the south bedroom. There was only one small problem- the 2 x 8s were not exactly the same size. For some weird reason, one of the beams was about a 1/4'' wider than the other. Which could lead to an out of balance issue when the beam is actually carrying some load. Maybe. Of course, it could just be me reclaiming my 'Most Cautious Man in America' mantle.


Anyway, I decided to plane the overhanging beam with my tiny little hand plane. 12 feet by 1/4'' is a lot of hand planing. It's fir, so it's kind of soft, but it was a solid hour of muscling it out. After I was finished, I screwed and glued the thing together and tomorrow, we are ready to set it in place. By we, I mean me and my muscles.


too tall on one side!

almost halfway there in the planing

Action shot! Lefty, even!

Done

Still done

Tomorrow: stuffing it in the wall!

Friday, August 1, 2008

new policies and insulation nation


Well!

This week's new policy of not allowing the client upstairs is working out very, very well. The main reasons being, I think, that she hasn't demonstrated any desire to venture upstairs and that I haven't actually articulated the policy. It's all for the best. It's an especially messy time right now and it wouldn't be good for anybody. I'm not completely sure what will happen when she finally does get the urge to head up.


It has been an insulating week and it will continue to be so. It's a disgusting, messy, will-sapping kind of work. But it does make a huge difference. At least it is not terribly hot, which helps. And the Mariners are not playing terribly right now, which also makes it easier to work. So far I've done the exterior wall in my closet and the master bedroom. I've also done the interior walls, which are really just insulated for sound, in the client's closet. For the exterior walls, I used the standard kraft-faced fiberglass bats, which get stapled to the studs. The overlapping little wings make it so you don't have to put up an additional vapor barrier. For the interior walls, however, I'm using this Ultratouch Cotton Insulation product, which I'm pretty sure is just shredded blue jeans.
I got it at the Environmental Crap Center, which has been changing it's name to ecohaus (with a small e nod to e e cummings or whatever) over the course of the last 9 months, though apparently just in it's signage and branding, not their listing in the phone book or their web address. It's typically ridiculous. How does this company stay so rigidly and wholeheartedly disorganized? For so long? Not only do you pay more because you want to build green, you also have to know their products and inventory because they don't, you have to wait around while the person helping you works on solving their cash register login like it's a Sunday sudoku, and if you don't know exactly what you want when you go in, it's like walking into Dante's Inferno. Only the fact that they are located in a city of Prius driving do-gooders explains their continued existence.
Anyway. Insulation. The thing is, the fiberglass is very personally damaging to install. It's long sleeve-glove-respirator time. The cotton is easy on the lungs and the skin. However, the fiberglass is easy to cut to shape. It can be made to fit snugly in odd shaped cavities and around electrical boxes and things with a straight edge and a razor knife. The denim stuff does not cut. You have to tear it apart, which makes neatness an issue and little voids unavoidable. And it takes a lot more time. The compromise will be that I'll continue to keep the inside walls forever in blue jeans and stick with the toxic stuff on exteriors. And I'll be done this week!

Wednesday, July 30, 2008

scrapple


As scrapple is often defined as 'everything but the oink', this here post is a mish-mash of things recently past and about to be recently past.


First, all that crapola taken out of the attic walls last week, mostly windows, trim, and siding, has to go somewhere, so it looks as though a dump run is in the works today. I may try and borrow a truck. It's getting a bit overgrown in there,


Next, I have taken advantage of the client's time in NYC to caulk around the shower fixtures. Exciting times! Only 1 year late. If you can't see the caulk, that's a good thing. There's a fan going full bore in there right now to hasten the curing process so she can take a shower and wash that city off her when she returns.


Finally, what a weekend! We went to Lopez Island and camped on the beach at Spencer Spit. Beautiful. The weather was a little dodgy, but it was warmer and more beautiful than it looks. We went over the two tent per site rule by about 11 tents, but it seems that the ranger was too intimidated to come down and cite us. Seamus wondered if perhaps he didn't have a large enough notepad to record all of our violations. Lots of cycling around, playing cards, staying up late singing, throwing the football, making delicious chow...


What happened to the gravity?


Rainier-fueled evenings


Is this really the best way to see if the grill is hot enough?


Friday, July 25, 2008

vision ruination redress

As a point of information and in an attempt to assuage the client's feelings of vision ruination regarding the view of the water from bed, I did some math this morning. As it turns out, one can see the water from a height of 13 " above our current bed height, meaning a 155 degree bend at the waist requiring a 2 pillow raise at the headboard. The old window height would have required around an 162 degree raise, or 1.5 pillow height, to view the water.

Viewing the water while lying flat on one's back or on one's side was never in the cards without some sort of mirror apparatus.

Thursday, July 24, 2008

window reactions

The new windows were mounted with sills 8" higher than the old ones so that it would be tougher to see in and we would have some more privacy in the bedrooom. The windows are larger than the old ones, so the top of the window was also raised around 10 inches. Some reactions:

[With the new higher mounted windows] "...you'll have so much more sky view and less rooftop view." -Stu, architect

[With the new higher mounted windows] "...you have so much more usable wall space under the window sill." -Robert, expert carpenter and window installer

[With the new higher mounted windows] "...it has ruined my vision of laying in bed and looking at the water, but I guess I'll learn to live with it." -the client

more window

Today I put in the small window that will go above our headboard on the south dormer wall of our bedroom. Having had a great refresher course in window install Tuesday, it went relatively smoothly.


new window on the left


Actually, not that smoothly. I forgot. I had to reframe the window because it sat too low- too close to the roof decking. So it is now 3 1/2" higher than it was, high enough to get it out of the roofing. And, now that I reflect on it some more, I remember that it looked as if the existing flashing actually goes underneath the sheathing. Which is bad. It actually directs rain to go under the shingles. And this on the rainiest and windiest part of the house, so I'll have to fix that before it rains.


That's the new window on the right.


I also put on the final weatherproofing around the windows installed Tuesday. Exciting times on a hot, sunny day with a spool of shiny plastic tar in your hands.


shiny plastic tar spool


Wednesday, July 23, 2008

New windows, round 1

Yesterday Robert and I put in the first round of master bedroom windows. As always, the project got a lot more involved after we got started. When we started to take apart the siding and the roof to make way for the new window framing (the windows are larger and they are moving up around 8" so as to get more blue sky view and less rooftop view and afford us a little more privacy in the bedroom), it was noticed that the roof underneath the dormer was really poorly constructed and needed to be repaired. So we took care of that. We fixed the roof sheathing, put down some new underlayment, repaired the flashing, and relaid the shingles. Fortunately, Robert is an expert at (among many, many other things) fashioning flashing corners. Saved the day.


You can kind of see how uneven the roofing looks underneath dormer. If you look closely, you can also see that there isn't really any flashing between the wall and the roof.


Unfortunately, this all had to get done before we could really start even getting going on the actual window install. Once that was all taken care of, we could move on to removing windows, making new holes for windows, preparing the new holes for windows, and dropping the windows in.


When we removed the old window, we had this giant sized hole left and we had to make some decisions. I accidentally blew out that piece of siding on the left with some exceptionally spirited demo. This is about the time that we noticed just how damaged the siding, flashing, and roof were.


We decided to take off all of the siding, because once we subtracted what we had to remove for the new holes and what was too damaged to reuse, there frankly was not much left. It didn't make much sense to leave a couple of pieces of siding and try to match new material to it. In the long run, it would be far easier to just take it all and redo it. We also took some of the sheathing so that we could replace it with stronger 3/4 " plywood. I think that by this point, the roof had been surgically repaired. We also took out a big header over the window- you've probably already noticed that the hole is higher than where the old window was sitting. Best part: we can reuse the vintage 1920s header over the new windows going into the south bedroom.


The next step was to build a new sill piece for the for the windows. That's an extra 8" of privacy. And it cuts off some of the view of the rooftops to the west.


After tar papering the exterior, we actually got to start installing some windows. In a full day of working (no stopping for lunch because we were on a deadline), I would say that less than an hour was actually spent putting the windows into the walls. Robert would muscle them out the window (they nail in from the outside) and I would push them into place from on the ladder. Of course I was wearing safety ropes and carrabiners and a helmet. You would even have to ask?


All in place! There are four casement windows and they all open up to 90 degrees.


From the inside, the higher up windows not only means a better view, but also more usable wall space underneath them.


Tica offered moral support all day long, only attacking Robert two or three times. Here she is modeling how she will be using the increased amount of sun in the bedroom.