Thursday, March 5, 2009

Tiny windows... In the wall...

To borrow a phrase from Michael Ian Black, this will totally blow your mind all over your face. Wall color drama over, drama about trim being too huge over, figuring our ladder logistics over.


It's a virtual photographic pep talk.


It took awhile, but it's nice to have one little part done. On to upstairs walls, radiators, flooring and dooring!

Wednesday, February 25, 2009

New Beam Redux

What's better than one beam? You guessed it: two. I was feeling some concern that although I had put in the new beam for the client's bathtub, the studs that came down into it were really compromised because of the horizontal vent cutouts.


Another call to the architect was required. More sage advice administered.


Delete the cutouts and lay another beam on top of the one that was just put in.
So here's that. Again with the UFO photographs.
Here's a better view. The new beam is a 4 x 4 that rests on top of the other one. I'm not totally sure how the dormer wall was staying up before. 4 out of 8 studs were cut almost all the way through to accomodate the vent.
On the back side, minimal damage to the bedroom wall. It looks a little goofy pre-painting, but it is smoooooth and will look great once finished.

3M Is Not Your Friend

When two walls come together that are different colors, I thought that it was standard practice to paint one side, let it dry, then tape over the painted part and paint the other side. Well, that may well work, but don't you try to do it with 3M Painter's Tape. I painted the ceiling in the hallway and let it dry for about three days. Then I taped up the line and painted the walls. The tape was off within three hours and the ceilings were definitely dry when it went on. And yet this is what happened.
Total crap. I'll be doing it over again today with a brush. After razoring and sanding and spackling it, of course.

Thursday, February 12, 2009

How Different Is Different Enough?

The Client has decided that the color for the accent wall in the stairwell needs to be more of an accent. It doesn't jump out. It doesn't highlight. It's too subtle. It's matches too closely with the other wall color.


Really?


I know this photo has a certain UFO quality to it, but I can still see the Shrek-green on the right and the camel hair on the left. The Client correctly pointed out that the fact that I would have to be the one repainting it was impacting my judgment as to what constituted different enough. True enough, but I say the fact that she doesn't have to repaint it leads to excess vacillation.

But no, the Client brought in her Sister with all her design cred and they agreed: Go from Shrek to Toad.


But see? This still the before/not different enough shot. All we have to do is to equip anyone walking up the stairs with a flash and anyone can see the accent wall clearly differentiated.


At least my weekend is setting up.

Wednesday, February 11, 2009

Winter Hiatus

It has certainly been awhile, but here I am back in the driver's seat, with news from the crusty underbelly of remodeling in a recession.

Let's jump right in, shall we? Last week I met with the architect because I was thinking about a new roof load issue that first came up over Thanksgiving weekend. In the spot where the Client's Big New Tub is going to be, we are going to be cutting off the roof and building a wall with a big window where she'll be able to have her bath and look out at the lights of the big city. I didn't really think about it too much then, but cutting off the roof and propping it up from somewhere else actually does have some ramifications in terms of how the roof gets held up. Especially if, as in the Client's case, a big window has to go in the wall that's going to be holding up the roof in the new spot.

Credit goes to Peter O. for pointing this out in the first place.

Happy Thanksgiving.
Fast forward to this week. Over coffee with our architect, I found out that this was one of those situations where planning and foresight would have saved money and time. But who wants to always take the easy road? Where's the character building in that?
The new solution is to build a beam into the wall that will disperse the point load created by the window in the wall made necessary by the viewtub over 5 or 6 joists, therefore saving the roof from collapsing and leaving everyone happy, warm, and dry when it rains.
Here's the wall that needs reinforcing. Notice the horizontal vent pipe near the bottom. I had already removed the vertical part of it and patched the roof up on Sunday. That was awesome. Every time go up there, the roof gets steeper. Not literally, the construction is sound, but in a metaphor about aging way.
The next step was to screw something to the wall to hold it up while I cut the bottom out. The 2 x 10 plank for painting did the trick. By the way, avoid Dewalt driver bits. I broke 6 (!!!) while hanging this.
Then, jam in the new beam!
Jam it!
And barely disturb the new drywall on the other side. I am amazing.

Saturday, September 6, 2008

Inspiration Nation

I took a walk around the neighborhood this morning to try to glean some inspiration by looking at projects that are bigger in scope than my own. It's been a few weeks since I've done any work upstairs let alone written about it here. School is cranking up again and that has been the major focus of all of my attention. I need to get into a new routine for the fall. Here are some highlights.

Date started: They tore down the house on this site sometime in 2007.

Uncompleted

There are some interesting things about this house. Looking through the windows, I think that they are going to be leaving the trusses uncovered on the third floor. The rectilinear cube thing with Hardipanel siding is all the rage right now.


Date started: spring 2008.
Uncompleted
This is a really wacky one. I couldn't get too much closer because there were people hanging out in the backyard and I wasn't feeling chatty. These folks are putting this crazy dormer roof deck thing on with an exterior staircase to get there. How will they finish this too blend it in?


Date started: I think they secured funding in 1998 or something.
Uncompleted. Scheduled to be completed summer 2010.
This is the new Jefferson Park underground reservoir vault. The new graded graveltop is new since the last time I was there. This is a really, really big project.


Date started: I don't know, but when I walked on this block three weeks ago, there was a regular looking house on this corner lot.
Clearly uncompleted
The foundation for this new sure to be space cube house is really small. It makes me think that they subdivided the lot and there will be a couple of townhomes on the site.


Date started: Who knows. They've been working on the light rail station forever.
Scheduled to be open Spring 2009.
Any time you have someone working on your project whose job title is 'miner', you know you're into something big.


Date started: Last fall
Uncompleted
The old jack up the house project. Yipes. THe client and I almost fell into this trap back in the Rainier Valley. These guys have had a massive dirtpile in front of their house for a long time.


Date started: This spring
Uncompleted
Embrace the density! These folks are going for the Cinderella tower/treehouse without a tree effect. It kind of looks like the bridge of a containership to me.


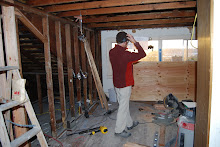
I guess it's time to stop fooling around and get back to work. Windows, finish the insulation, and cover!


Saturday, August 16, 2008

We Are the Ronchampions, My Friends

Yesterday, all eleven stairwell windows were installed along with the three windows in the south bedroom, which is quickly shaping up as this year's 'must have' bedroom.


The first part of the project was actually Operation Defenestrate Fife, wherein the windows had to be surgically extracted from the manufacturer. If you've never been to a fiberglass window manufacturing facility, well, it's huge and loud and kind of smelly in a solventy way, but really clean and full of trucks. I had to wedge my rented truck, which you can tell is a real gem, in between the many semis picking up much larger orders than mine.


As it turns out, I may have rented a little too much truck, but I wasn't really sure how much space the windows would be taking up.


On my way back from Fife, I passed this huge bus fire on I5 going in the other direction. It was scary. The bus was fully engulfed in flames, tons of black smoke everywhere, and it was really, really hot.


I had to call in reinforcements to get the larger windows into the south bedroom. Fortunately, I know a lot of teachers who do nothing but sit around and eat bonbons all day every day in the summer, so I gave Thatcher a call and he dropped the bonbons and was right over to help me muscle in the big guys.


Next, the stairwell one by ones. I figured out a good method to 1) get the windows in and level and 2) not fall off the ladder by the second window. Which means, of course, that I only had to do a do-over on the first one I did.


I stacked all the windows on my building platform inside and pulled them out one at a time to install. First I would put a bead of caulk around the window hole. Then I put a deck screw in one of the side holes of the window so that it would stay in the wall and I could still adjust it for level. After I levelled it, then I pounded in 2'' roofing nails through the rest of the holes in the fin. Wash, rinse, repeat times 11.


The window on the tippy top left is the only one that I had to redo.


Too pretty for captions. I thought I might have broken the client's camera, but no.